Showing posts with label antique textiles. Show all posts

Thursday, April 29, 2010

The Dog Ate My Quilt

Destroyin’ Norman, the Labrador Retriever is one lucky dog. When his owner brought me the product of his labor (1st photo), I wasn’t sure I could put Humpty Dumpty together again. The Grandmother’s Flower Garden quilt was over 70 years old and fragile. Now a dog had taken a big bite out of it. How is one supposed to age gracefully with a chunk missing?


The first thing I did was look at it for a day, hoping some magic power would come through my eyeballs and fix it. When that didn’t work, I got busy. One of the half flowers at the border needed replacing as did a 2 foot section of the border itself. The batting, back and binding for the section also had to be replaced (next 3 pictures). Then the new section would have to be hand quilted, matching the stitches of the original quilter (“Good luck with that,” Norman chuckled). Two big challenges were finding fabric that matched the old border fabric, and trying to attach the new section to old fragile material. Finding the fabric was easier than I thought it would be; thank goodness Depression era colors are popular right now. Getting everyone to play together nicely was another matter.

The old border fabric and the background hexagons are very delicate, and fell apart in places when machine sewing was attempted. After more than a few Diva Moments (“This looks like trash, and trash is not allowed to exist in my presence!”), trying the Magic Eyeball trick again, and walking away a couple of times to mutter to myself, everything finally came together and stayed together. I wondered if there was a place I could take the quilt to have all the negative energy removed, but decided a good airing would do just as well.

Norman is out of the dog house for now...

Thursday, April 22, 2010

Time For A New Look

At last, renovations have started on my aunt's Flower Garden quilt.  It's a little sad covering up an old flower, but at least it's still part of the quilt.  Now the old flower is protected, and the new flower makes the quilt more stable.

The first picture shows an old flower that has seen better days (see the far left blue flower in the middle).  Good-bye old flower!  The new flower is then basted over the old to hold it in place (picture 2), then hand appliqued to the quilt (picture 3).  Finally, the quilt stitching on the rest of the quilt is repeated in the new flower (picture 4).  My grandmother made some of the tiniest stitches I've seen; it's going to be challenging to match her standard.  Only 11 more flowers to go, and it's finished - I may be writing from the looney bin next time (ha)!

Friday, April 9, 2010

Grandmother's Flower Garden Quilt, Part V

I've been a busy bee in the flower making department, but kind of slack in the picture taking area.  Four more flowers are done.  Hooray!  There are two more left to do, then the fun really begins - actually restoring the quilt.  I talked to my aunt yesterday, and she kept telling me to "take my time."  That's code for "don't rush and screw up."  Just kidding, Auntie!  Before I get myself into trouble, let me describe the fabrics used.

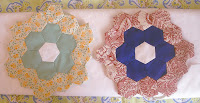
The flower on the left in the first picture is made with a small yellow floral print accented by solid mint and a white-on-white fern print center.  Like my grandmother, I had to make do with what was on hand for the second flower.  The darker pink floral is a 30s repro, and I thought I had enough scraps to make 12 hexagons, but I think I was just wishing there was enough.  The other pink is also a 30s repro.  Not an exact match, but it gives the flower character.  The other fabrics are solid yellow and a tiny white-on-white floral center.

In the second picture, the flower on the left is also a 30s repro of yellow roses and green leaves.  It's complemented by solid nile green and a dragonfly white-on-white print in the center.  Last but not least, something a little different.  The red and cream hexagons are made with an Art Nouveau style print.  It is highlighted by solid blue and cream-on-cream stars in the middle.  A patriotic flower amid all the flowery ones. 

Flower #11 is in production, so it won't be long until "real" quilt work begins.  Stay tuned!

Monday, August 31, 2009

"New" Antique Textiles

I went on a bender the other day and bought a ton (OK, a little less) of antique textiles.  It’s a good thing my affinity for old stuff runs in less expensive areas than let’s say furniture or jewelry.  OK, on to the “booty”.


First are 3 linen hankies, which are hand embroidered in the corners and around the edges. The needlework is exquisite, and its perfection is what drew me. Ditto for the 2 hand sewn picot trimmed doilies. They’re cotton, also hand embroidered and 11” x 8”. Both items are in excellent condition for being over 60 years old.


I also found a set of 8 colored damask rose napkins from the 50s. They had never been used or even unfolded. What a shame since they are so gorgeous. When put in the light, the white on white design radiates like sunbeams. After I got the napkins home, I was afraid they would fall apart because they were stiff at the fold lines from disuse. But no worries, after a little soak, they were as good as new. I don’t know what I’m going to do with them yet – I may just put them to their original use as napkins!


The piece de resistance is a twin size quilt top made from 2” feedsack squares from the 30s. Each square is hand sewn, and the points match up perfectly. The seams haven’t come apart anywhere even after all this time. I wonder how long it took to make – probably years. I did my best not to let my spazziness out in public, but it was hard. I think my inner fabric nerd fainted. I’m certainly going to finish quilting and binding it, but whether the quilt goes on the website is another matter. I don’t know if I’ll be able to part with such a labor of love.

Saturday, August 22, 2009

1907 Redwork Signature Quilt, Part II


I had an opportunity to turn a 101 year old redwork signature coverlet into a quilt. It was time to quit hyperventilating and get to work. The coverlet had been in storage for many years, which explained its excellent condition, but after a century of service, everything needs a little work. The main problem was that the red herringbone stitches that decoratively tied the squares together were coming undone.


But first a little history (no, no, don’t skip, it’s not long or boring). Each contributor embroidered a muslin square with a picture (usually domestically oriented), the date, her name, and the town where she resided. This is why it’s called a signature coverlet. The thread color most often used was called Turkey Red, which is where the term “redwork” draws its name. Redwork was very popular in the late 19th and early 20th centuries. See? Was that so bad?


Each square was sewn together, then a red herringbone stitch was sewn over the seams to tie it all together. Later, a ruffle was added to turn the coverlet into a bedspread. This coverlet’s third incarnation would be as a quilted wall hanging. My mantra was “don’t screw up, don’t screw up...”


The first order of business was to repair the seams. After further inspection, it wasn’t so much that the thread had come out of the needle holes, but that the fabric was pulling apart from the thread. There just wasn’t any fabric left at some of the seams to sew them back together. Yikes! Fusible webbing to the rescue! I sewed where I could sew, zig-zagged stitched where I had to (all by hand), then applied fusible webbing to the back of all the seams to make the whole quilt top stronger for quilting and hanging. Next I had to fix some herringbone stitches and completely redo others. It was so cool to find the needle holes in order to duplicate the stitches. It was like following a trail of bread crumbs left by another woman a century ago. Cooler still to know that I was the first person in a hundred years to sew on that fabric. I was really being a big spaz now, but only the dog was around to see.

Here are some of my favorite squares: (1) This is my favorite, because the sentiment is so punny: “I wish you joy from the bottom of my soul” AR AR

(2) This is my second fave. The temperance movement of the 19th and early 20th centuries was an organized effort to encourage moderation in the consumption of liquor or press for complete abstinence. A temperance drink was one that did not have alcohol. A political statement to be sure, but it seems Mrs. Hull thought very little of temperance drinks, comparing them to a donkey drinking from a water trough.


(3) This is a bow wrapped around the violin before the embroidery was repaired. The blue pattern line is still visible after 101 years.


(4) This was a popular redwork pattern at the end of the 19th century. In various pattern catalogs, it was mistakenly labeled a moose. The needlewoman, Mrs. E. Bessey, correctly named the animal on her square (you can tell it's a reindeer because of the antlers). The repair in the upper left corner was done hastily, and consumes all of the herringbone stitch.
 
(5) Here's Mr. Reindeer after the bad repair was removed.
 
(6) Here he is after the seam was resewn, and a new herringbone stitch was applied. It was so cool to figure out how the decorative stitches were sewn in order to duplicate them. Even more amazing to know that I was the first person in a hundred years to sew on that fabric.


(7) After all the squares were repaired, it was time to quilt and bind. Piece o’ cake after all the other drama. Here’s what it looked like (a close up anyway) after I was finished.


(8 & 9) The finished product, ready for another 101 years.  The last picture is of the back with the hanging sleeve attached.  The client was extremely happy with her new quilt/wall hanging, which was good, because I think I would have busted down bawling if she hadn’t liked it.
 
If you would like to see all the squares, and the history behind them, please go to my Flickr page: http://www.flickr.com/photos/quilted_lovelies/.

Friday, August 21, 2009

1907 Redwork Signature Quilt, Part I


One of the things I’m ga-ga for is antique textiles. I love old quilts, hankies, napkins, fabric, you name it. I wish they could talk to me and tell me their story. Last year my wish was granted (sorry, no talking fabric). I received a call from a nice lady asking me to turn her bedspread into a wall hanging. “It’s been in the family for years, and I want it out where everyone can see it.” Sure, says I, and since she was local, I went to her house to see the bedspread. I was thunderstruck when she brought out a perfect example of early 20th century redwork. I was awestruck by how well preserved it was, and it was a signature quilt to boot! My mouth fell open and I couldn’t speak. I heard angels singing. Then I heard my little voice tell me, “Shut your mouth and straighten up! Be a professional for crying out loud!”

The bedspread, without the ruffle, measures 62” x 80”, and has 10 rows of 8 blocks each. The client told me it was a wedding gift to a great-great aunt, and had started life as a coverlet. The ruffle was added some time later, but she didn't know when. I had been commissioned to repair split seams and embroidery, and turn it into a quilted wall hanging so it could be displayed. What a career highlight! Then after my head quit buzzing, I realized everything had to go off without a hitch. ACK! ACK! Where’s my paper bag to breathe into? Why did I say yes?!